Browsing Category:

Crafts

Bostik Bloggers Challenge – Sport

Tabletop basketball tutorial

I’m a bit late with my Bostik craft post this month. It’s been a bit manic what with all theย end of year activities and the start of the summer holidays.

I finally managed to get it done today so here’s our tabletop basketball net ๐Ÿ™‚

You will need:

Different coloured card
Glue dots
Lolly sticks
A Sharpie or other permanent marker
A plastic drinks cup
A small pom pom
Sticky tape
Pipe cleaners
Scissors

Bostik tabletop basketball tutorial

Cut the bottom off the plastic cup. Using the sharpie, draw lines on it to make it look like a net.

Bostik tabletop basketball tutorial

Draw a back board shape on one of the pieces of coloured card and cut it out.

Bostik tabletop basketball tutoria

Using a glue dot, stick the 2 lolly sticks together.

Bostik tabletop basketball tutorial

Wrap the pipe cleaners around the lolly sticks and attach to the cup/net using glue dots or sticky tape.

Bostik tabletop basketball tutorial

Cut 2 rectangles out of the 2 different coloured pieces of card, making one smaller than the other. Using a glue dot, stick the smaller piece to the larger piece then stick this onto the backboard.
Attach the cup and sticks onto the backboard using glue dots or sticky tape.

Bostik tabletop basketball tutorial

We now need to make the base. Using the other piece of coloured card, cut a rectangle. You can measure it properly if you like to make sure it all folds evenly but to be honest, we just winged it!
Cut a line down each corner and fold the card to make a box shape.

Bostik tabletop basketball tutorial

Fold all the end pieces and apply glue dots to the coloured side of the four triangles on the short side.

Bostik tabletop basketball tutorial

Stick the triangles to the inside of the box then apply more glue dots to the rest of the triangles.

Bostik tabletop basketball tutorial

Bostik tabletop basketball tutorial

Stick the triangles down and you’ll have the box stand.

Bostik tabletop basketball tutorial

Make a cut in the middle of the stand and push the lolly stick through. Use sticky tape to secure the stick to the box stand.

Bostik tabletop basketball tutorial

Your tabletop basketball net is now ready to use. Here’s where you need the pom pom!

Bostik tabletop basketball tutorial

Jungle Craft – Bostik Bloggers Challenge

Jungle craft

In our Bostik bloggers craft box this month, we received, among other things, lots of jungle animal shapes.

Kaycee made a jungle scene using a blank canvas. There was also some green glittery and plain green card in the box. It worked great for the backing, jungle floor and tree tops. Kaycee loves creating things when the box arrives every month and she’s now the one that does the photographing for the blog ๐Ÿ™‚

After she’d finished the picture, she saw a packet of Bostik sticky dots that she’d not noticed when she started it. She loves sticky dots, they’re her favourite form of glue and she couldn’t believe she’d missed them and used regular white glue instead!

Bostik bloggers challenge

Bostik bloggers challenge

She used the plain green card, cut it to the same size as the canvas and glued it on. The glittery card was used to make the jungle floor. More glittery card was used at the top of the canvas for the treetops.

Bostik bloggers challenge

She twisted some pipe cleaners together to make tree trunks and glued them to the canvas.

Bostik bloggers challenge

Bostik bloggers challenge

She used the felt to make water then decorated with different animal shapes.

Bostik bloggers challenge

Finally, she scrunched up some netting to use for the treetops ๐Ÿ™‚


Thanks to Bostik and Tots100 for the box of craft items.

Weather Craft – Bostik Bloggers Craft

Weather Craft

Kaycee took charge of our monthly craft for Bostik again! She’s been really poorly all week but today she felt much better, just in time to get crafting ๐Ÿ™‚

She’s made a weather chart and here’s how she did it.

Craft items for weather craft

You will need:

A paper plate
A cloud, lightning and snowflake foam shape
A gold pompom for the sun
Gems for the rain
Snowflake gems
A piece of card to make the arrow
Some glue
A split pin

Method

Paper plate split into quarters using a sharpie

Using a marker pen, draw a cross on the plate to split it into quarters

Snowflake foam shape

Stick the snowflake gems onto the snowflake foam shape

Weather chart

Stick the pompom onto the plate in the middle of one of the sections. So the same for each foam shape. You can label the sections if you like.

Card arrow

Using the card, cut out an arrow shape. I suggest you make it a bit bigger than we have!

Weather chart craft

Push the split pin through the arrow and then through the plate. Open up the ends of the pin at the back of the plate to keep it in place.

It was nice and sunny today so we moved our arrow to the sun ๐Ÿ™‚


Thanks to Tots100 and Bostick for the monthly craft challenge.

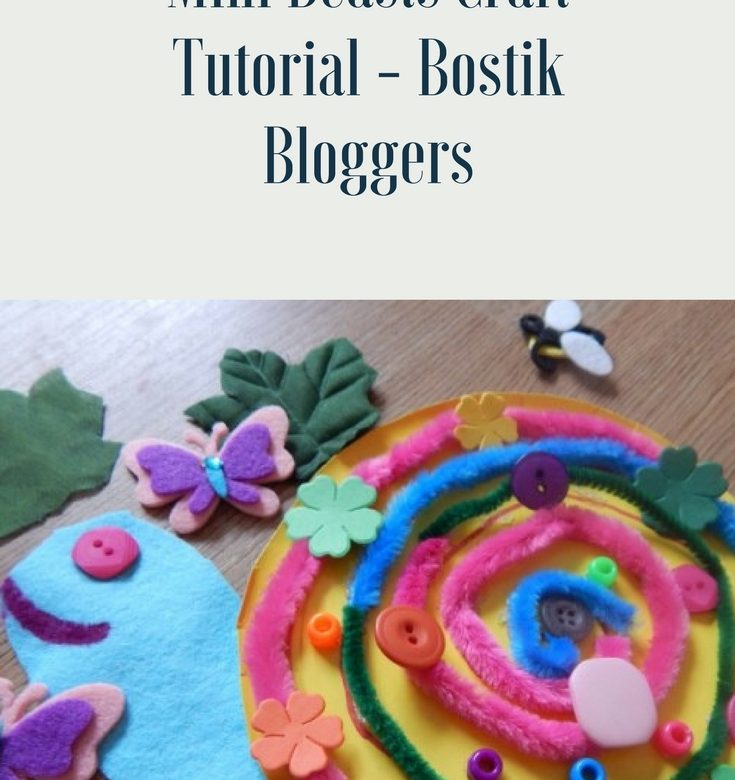
Bostik Bloggers Craft – Mini Beasts

Mini Beasts

The girls love getting the Bostik bloggers craft box every month and usually work together to make something but this month, Ella’s been really busy with one thing and another so Kaycee did it all on her own this month.

The theme is Mini Beasts. For more activities about this theme, click here

She took all the photos and is writing up the tutorial so I’ll hand over to Kaycee ๐Ÿ™‚


Image26

what you need :

felt
buttons and other creative decorations
paper plate
pipe cleaners
stickyย dots
marker pen

bostick-craft-bloggers-mini-beasts-01

draw a spiral onto a paper plate and then cut off the outside rimย ( it does not matter if it looks a bit messy)

bostick-craft-bloggers-mini-beasts-02

using glue dots stick pipe cleaners tracing the spiralย (again it does not matter if it looks messy)

bostick-craft-bloggers-mini-beasts-03

decorate in between the pipe cleaners using buttons and craft bits

bostick-craft-bloggers-mini-beasts-04

Then cut out (using felt) the shape of a snail body and stick to the back of your plate

bostick-craft-bloggers-mini-beasts-05

add a button as the eye and use the marker to draw a lovelyย smile!

bostick-craft-bloggers-mini-beasts-07

to add sturdiness attach two lollypop sticks to the back

bostick-craft-bloggers-mini-beasts-06

pierce a hole and thread string through it

bostick-craft-bloggers-mini-beasts-09

you can now hang it on the wall as a pretty decoration ๐Ÿ™‚

bostick craft bloggers mini beasts


Great job, Kaycee ๐Ÿ™‚

Thanks to Tots100 and Bostick for the monthly craft challenge.


shell-doll-sig-01

For more craft ideas, click here

Dragon craft – Bostik Bloggers Monthly Craft Challenge

Dragon Craft

Kaycee's Dragon - dragon craft
Kaycee’s dragon

Our Bostik Bloggers craft box arrived last week but the girls have been busy with Guides/Cubs/Football clubs etc that we’ve only just managed to make our dragons!

For this craft, you’ll need:

3 toilet roll middles
Glue
Coloured/Patterned paper or card
Gems/Decorations
Pipe Cleaners
Stapler
Threaded sequins or wool/elastic
Felt


bostik-craft-bloggers-dragons-01 - dragon craft

Decorate the three toilet roll middles, one for the head and two for the body

Decorated toilet roll middles - dragon craft

Using felt or coloured card, make the eyes. We cut ours so they had big eyebrows!
Using glue, attach to the toilet roll middle that you’re using for the head, then using a stapler, staple pipe cleaners in the mouth for the fire.
Draw on the teeth down each side of the toilet roll middle and dots on the top for the nostrils.

Dragon head - dragon craft

Using sequin string or wool/elastic, cut a piece about 10cm long and staple inside the head, behind the eyes.
Staple the other end inside the first roll that you’re using for the first body part.

Attaching the toilet rolls - dragon craft


Attaching the toilet rolls - dragon craft

Attach the last body roll in the same way and if you like, add some more pipe cleaners for the tail

Toilet paper dragon craft
Ella’s dragon

We were sent a box of craft items from Bostik and Tots100 as part of the Bostik bloggers crafters.

For more craft posts, click here

Bunny Tails Easter Activity Tutorial #BostikBloggers

ย The theme for our Bostik Bloggers craft challenge this month is Easter so the girls are making these lovely Easter gifts to give to friends at school. They’re very easy and cheap to make ๐Ÿ™‚
Bunny tails marshmallow Easter gift - Easter activity

Easter Activity

You will need:
Small cellophane food bags
Card
A stick on spring flower
Decorative tape
A bunny shape cut out of card or like ours, a piece cut out of a sheet of foam
Adhesive
Double sided sticky pads
Felt tip pen
White mini marshmallows
Easter Craft supplies - Easter activity
Gather your supplies


Marshmallows and craft supplies - Easter activity


Bunny tails bag header card - Easter activity
Cut a piece of card the same width as your bag.
Our bags are 9cm x 13cm so I made the header 9cm x 7cm


Decorate bunny tails bag header - Easter activity
Decorate the header with the tape, flowers and rabbit shape then write Bunny Tails on it and fold it in half


Put marshmallows in bag - Easter activity
Fill the bag 3/4 full with marshmallows


Seal marshmallows in bag - Easter activity
Double fold the top of the bag and secure with some tape
Finished bunny tails gift bag - Easter activity
Use 4 double sided sticky pads, one on each corner inside the header to secure the header to the bag


Easter crafts bunny tails bag and Easter chick card - Easter activity
This is Kaycee’s bunny tails bag and an Easter decoration she made with some of the other craft materials.


Ella's Easter crafts - Easter activity
Ella made a little bunny family…


Ella's bunny tails - Easter activity
before making her bag of bunny tails ๐Ÿ™‚

For more craft posts, click here

Valentine’s Card – Bostik Bloggers Challenge

Valentine's Card

We’re very excited to be part of the Bostik Bloggers family this year. We received our first craft box on Saturday and found time last night to make a Valentine’s card.
We wanted to be a little more creative with our first box but time wasn’t on our side this week!

Kaycee made a Valentine’s postcard, Ella made a Valentine’s picture card for her teacher and I made a Valentine’s card for Ant, which I’m going to show you how to make in the following tutorial.

Valentine’s Card

You will need:

A4 Gold card
Red glitter card
A piece of patterned fabric or backing paper
Gem heart stickers
Glue
Ribbon
Red glitter pen


Instructions

Fold the gold card in half.

Using the backing fabric/paper, cut 3, 5cm squares and glue them onto the card, overlapping them and rotated into diamond shapes.

Stick the gem hearts in a horizontal line, onto the top corner of the card. Cut a love heart shape out of the red glitter card and glue it onto the middle square

Using the red glitter pen, draw a love heart at the bottom corner of the card then stick the ribbon down the other side of the card.


You can still see the white glue on the card above but once it dries, it goes clear so you won’t see it ๐Ÿ™‚

Here are Kaycee and Ella’s creations.

Ella’s card for her teacher (I covered her teacher’s name)


Valentine's card
This is Kaycee’s card. I’m not sure if she has a recipient in mind!


For more craft posts, click here

Christmas Crafting

Our advent activity today was to do some Christmas crafting.
Kaycee’s made a lovely card for a teacher at school and Ella had great fun making a glittery card for her great Nan-Nan as well as a tree decoration and gift box for Santa ๐Ÿ™‚

Christmas crafting - Kaycee colouring


Christmas crafting - Ella crafting
Ella’s decorating a little box for Santa
Christmas crafting - Kaycee making a Christmas card
Kaycee made a Christmas card for one of the teachers at her school


Christmas crafting - Kaycee's finished card
She was very proud of it and I think she did a great job ๐Ÿ™‚

I’ve got some more photos to add but for the life of me, I can’t find my camera!
I’ll be back tomorrow, when I’ll have, hopefully, found it ๐Ÿ™‚

5 Autumn Wreath You Tube Tutorials

Collage of autumn wreaths

I love wreaths but I’ve never tried making one before. I like the idea of changing door wreaths with the seasons so I’ve collected together some YouTube tutorials for wreathย making that look easy enough for me to do this autumn!
Whether I’ll actually get myself in gear and get one made is another matter entirely ๐Ÿ™‚

I’m going to collect some tutorials from YouTube for Christmas, Spring and Summer wreaths as well. it’s a craft I think I’d really enjoy and the girls will probably want to help as well.

Clutterbug

Autumn wreath and family plaque on a door

Trendy Tree

Autumn wreath with moss coloured owl

Another Trendy Tree ๐Ÿ™‚

Deb Anderson

Click here for the You Tube video

Mardigras Outlet

For more craft posts, click here

Compact Disc Garden Mobile

Kaycee wanted to make Nanny a present for her birthday that was just from her.
I’ve been helping Ant with sorting out his office and he was chucking out a lot of CDs so I saved them for the girls to use in their crafting. KayCee decided to make a compact disc garden mobile for Nanny.
You will need: CDs, sharpies, thread, double sided tape and scissors

You’ll need:

Old CDs
Sharpie markers or other permanent coloured markers
Double sided tape
Scissors
Wool or string
Two sticks (not pictured)


Using the Sharpies, decorate the CDs
If you can’t be bothered to get the print off the CDs, use double sided tape to stick two print sides together, leaving you with two silver sides.
Use the Sharpies to decorate your CDs. Kaycee made 5 CDs to hang from her mobile.


Decorated CD


Ella decorating her CD
Ella decorated her CDs to make a spinner


Decorated CDs
Use wool or string to tie the two sticks together in a cross then use more wool/string to hang from the centre of the sticks and from the end of each stick.


Finished mobile hanging in the garden


Compact disc garden mobile
We got Ant to drill holes in the edge of each CD but you can just put the wool/string through the hole in the middle and attach it to the stick.


Compact disc garden mobile


Compact disc garden mobile


Compact disc garden mobile


Compact disc garden mobile
Nanny loves her new mobile but she has said it’s scared her a couple of times when it has looked like there’s been someone moving in the garden and it was the light coming from the CDs!


Verified by MonsterInsights