Browsing Category:

Christmas

Mini Felt Tree Decorations

Mini felt tree decorations

We bought a lovely wooden advent calendar, with little drawers, from Homesense last year. I love how it looks, but it’s not very good for an advent calendar. The drawers are tiny. Mini felt tree decorations

Last year I bought some troll keyrings, tattoos and other small things. that I have totally forgotten about, to put in the drawers! It took ages trying to find things small enough to fit and, after spending a couple of hours checking Amazon for small toys, I gave up.

I decided I’d make mini felt tree decorations, to put in the drawers. I bought the girls a mini tabletop Christmas tree each. They took it in turns to open the drawers and added the felt tree decoration, for that day, to their Christmas tree.

I also bought 24 Emoji tattoos to put in the drawers, because, like most children these days, they love Emojis!

The girls were surprised and delighted when the first drawer was opened. We bought some battery operated LED lights for each tree. They looked lovely when all the decorations had been put on.

Making them wasn’t easy, at all!

I got ideas from Pinterest and made them without a pattern. Making them so small made it very difficult. It took me nearly 2 weeks, making a couple each night when they were in bed.

mini-felt-christmas-tree-decorations-02


mini-felt-christmas-tree-decorations-04

I think their favourite decorations were the Minion and Kevin the carrot (although, he hasn’t got arms and legs like Kevin!)

mini felt tree decorations

Our Christmas Day – We’ve Been Spoilt!

We’ve been spoilt!

Christmas 2016 has been wonderful. We’ve all been thoroughly spoilt by family and friends. I am a little sad, though, Ella’s 9 now and I felt a definite shift in the magic. They’re all growing too fast and I really noticed it on Christmas day. It didn’t feel as magical as it usually does. I’m putting it down to them all growing up and it makes me sad.

Christmas day 2016


christmas-day-2016-02

Christmas Day mess – the best mess there is :o)

christmas-day-2016-03


christmas-day-2016-04

Ella’s presents

christmas-day-2016-05


christmas-day-2016-06


christmas-day-2016-07


christmas-day-2016-08


christmas-day-2016-09


christmas-day-2016-010

Kaycee’s presents

christmas-day-2016-011


christmas-day-2016-012


christmas-day-2016-013


christmas-day-2016-014

Aiden’s presents

christmas-day-2016-015


christmas-day-2016-016


christmas-day-2016-017

My presents :o)

christmas-day-2016-018


christmas-day-2016-019


christmas-day-2016-020


christmas-day-2016-021


christmas-day-2016-022


christmas-day-2016-023

Ant’s presents

christmas-day-2016-024


christmas-day-2016-025


christmas-day-2016-026


christmas-day-2016-027


christmas-day-2016-028


christmas-day-2016-029


Christmas day 2016


christmas-day-2016-030


christmas-day-2016-031


christmas-day-2016-032


christmas-day-2016-033


Thank you to everyone who bought us such thoughtful gifts and who came to spend time with us. We loved seeing you all :o)

Previous Christmases

2015
2014
2013

Our Christmas Eve photos

Christmas Eve Photos

We had a wonderful Christmas Eve. As usual, we did a buffet tea and had some of the family around. It was lovely to see everyone and they all seemed to have a good time.
I totally forgot to take photos so these are ones that Ella took :o)

Christmas Eve Photos
Kaycee and Ella’s book advent books, the last mini felt decoration and our activity advent which was to open the Christmas Eve presents, have hot chocolate with marshmallows, sprinkle reindeer food and put a drink and cookies out for Santa.
Christmas Eve Photos
Ella and 2 of her brothers
Christmas Eve Photos
Our gorgeous Grandson, Damien 🙂


Christmas Eve Photos
Gemma and Nettie


Christmas Eve Photos


Christmas Eve Photos
My mum, Bethany and Kieron


Christmas Eve Photos
Jervais


Christmas Eve Photos
Bethany and Kieron


Christmas Eve Photos
Tina


Christmas Eve Photos
Bethany, Kieron and Phil


Christmas Eve Photos
New Christmas pjs 🙂


Christmas Eve Photos
Our new Christmas mugs. LOVE them 🙂
Christmas Eve Photos
We have a huge family who all buy us and the kids presents. This was before Santa had been!

Christmas Wishes & A Happy New Year :o)

Christmas Wishes


christmas wishes
Christmas Wishes

Christmas wishes from my family to yours.

We wish you a Merry Christmas;
We wish you a Merry Christmas and a Happy New Year.
Good tidings we bring to you and your kin;
Good tidings for Christmas and a Happy New Year.

Oh, bring us a figgy pudding;
Oh, bring us a figgy pudding and a cup of good cheer
We won’t go until we get some;
We won’t go until we get some, so bring some out here

We wish you a Merry Christmas;
We wish you a Merry Christmas and a Happy New Year.

Please feel free to right click and save this image. You may use it freely 🙂 Merry Christmas!

There’s another free Christmas image here


Let It Snow Scrabble Ornament #24XmasCrafts

Let It Snow Scrabble Ornament


I can’t believe it’s Christmas Eve already! For our final #24XmasCraft advent tutorial, we made a Let It Snow tree ornament using Scrabble tiles.

You will need:

  • Scrabble tiles
  • Card or stiff paper with a Christmas design printed on one side (not pictured)
  • Fake snow
  • Ribbon
  • Glue – I found a glue gun worked best

Let it snow Scrabble tree ornament

Draw around the scrabble tiles as in the photo below.

Let it snow Scrabble tree ornament

Cut out the card.

Let it snow Scrabble tree ornament

Stick the Scrabble tiles onto the plain side. I found using a hot glue gun worked best.

Let it snow Scrabble tree ornament

Bend each row apart so you can glue in between the tiles.

Let it snow Scrabble tree ornament

Glue the ribbon to the back. If you want to cover the ribbon, cut another piece of card, the same size as before and glue it to the back, over the ribbon.

Let it snow Scrabble tree ornament

Put glue on the top of each row and sprinkle the fake snow onto the glue. When the glue is dry, hang on the tree.

Let it snow Scrabble tree ornament

I hope you’ve enjoyed our #24XmasCraft advent tutorials. We had great fun making everything.

Merry Christmas and a very happy new year 🙂

To see all of the 24 tutorials, check out my Pinterest board

Paper Plate Angel #24XmasCrafts

Paper Plate Angel


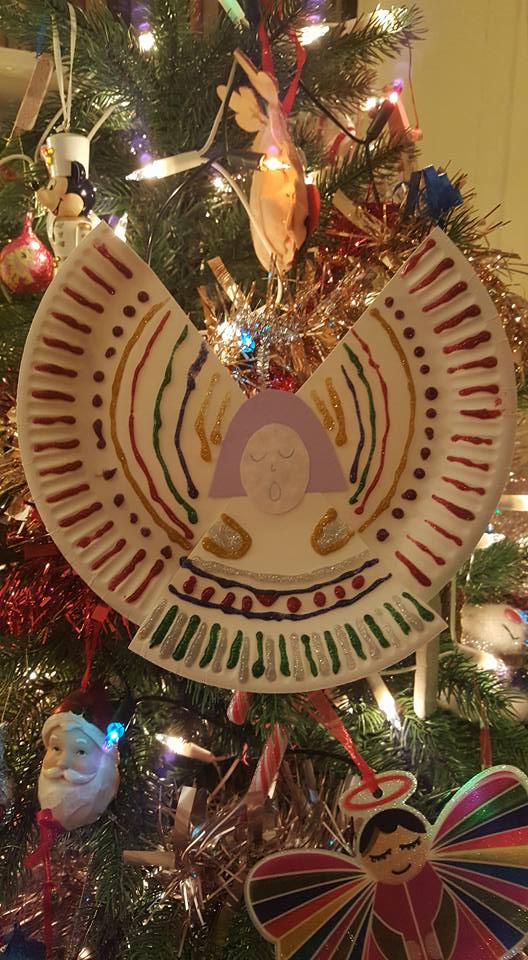
Here’s our penultimate Christmas craft tutorial and we’re going to be making paper plate angels. It’s another easy craft for little hands 🙂

Paper plate angel

You will need:

  • A paper plate
  • Scissors
  • Glue
  • Card for the hair and face
  • A silver pipe cleaner
  • Glitter glue
  • Sticky tape

Paper plate angel

Cut a triangle piece out of the plate to make the angel’s body.

Paper plate angel

Cut a circle for the face and a piece of hair out of the card. Draw the features on the face.

Paper plate angel

Stick the face to the hair then stick the face and hair to the body.

Paper plate angel

Stick the body onto the other piece of the plate which will be the wings.

Paper plate angel

Make a halo using the silver pipe cleaner.

Paper plate angel

Stick the halo to the back of the angel using sticky tape.

Paper plate angel

Decorate the angel’s dress and wings with glitter glue and allow to dry.

Paper plate angel


Paper plate angel


It’s our last #24XmasCrafts tutorial tomorrow and we’ll be making another scrabble Christmas tree ornament.

To see all of the 24 tutorials, check out my Pinterest board

Paper Star Chain #24XmasCrafts

Paper Star Chain

We love all things glittery and this paper star chain is no exception. It’s very easy to make and looks pretty when hanging on the wall or door.

paper star chains

You will need:

  • Paper
  • String
  • A pencil
  • A mug
  • Glue
  • Glitter
  • Sticky tape

paper star chain

Draw around the mug on a piece of paper and cut out the circle. Fold it in half then fold it in half three more times. Draw a line at the top from corner, as in the photo and cut along this line.

paper star chain

Open up the paper and you will have a star. Now decorate the star with glue and glitter.

paper star chain

Stick the string to the back of each star using sticky tape.

paper star chain

Hang on the wall or a door or anywhere you like, really!

paper star chains


Only 2 more to go! Tomorrow we’ll be making paper plate angels.

To see all of the 24 tutorials, check out my Pinterest board

Candy Cane Reindeer #24XmasCrafts

Candy Cane Reindeer

Kaycee loved making these sweet candy cane reindeer. They don’t take very long and are another cheap and easy gift idea for school friends 🙂

candy cane reindeer

You will need:

  • A candy cane
  • 2 googly eyes
  • A pipe cleaner
  • A pencil
  • Glue
  • A sparkly pom pom


candy cane reindeer

Fold the pipe cleaner in half to find the middle then twist it around the top of the candy cane to secure it.

candy cane reindeer

Wrap each side of the pipe cleaner around the pencil to make the antlers.

candy cane reindeer

This is what you should have.

candy cane reindeer

Glue two googly eyes onto the candy cane.

candy cane reindeer

Glue the sparkly pom-pom onto the end of the candy cane to make the nose and you’re done 🙂

candy cane reindeer

Mix and match different coloured pipe cleaners and pom-poms to make different ones.

candy cane reindeer

Day 22 tomorrow and we’ll be making a paper star chain.

To see all of the 24 tutorials, check out my Pinterest board

Cinnamon Dough Tree Ornaments #24XmasCrafts

Cinnamon Dough Tree Ornaments


These no-bake cinnamon dough tree ornaments smell lovely and dry a nice light brown colour. You can leave them as they are or paint them.

cinnamon dough tree ornaments

You will need:

  • 1 cups of plain flour
  • Half a cup of salt
  • Half a cup (approx 40g) of cinnamon
  • 3/4 cup of water
  • Rolling pin
  • Christmas cookie cutters
  • Ribbon
  • A straw

cinnamon dough tree ornaments

Mix all the ingredients together until a dough forms. Knead the dough for around 5 minutes.

cinnamon dough tree ornaments

Roll out the dough to the desired thickness.

cinnamon dough tree ornaments


We rolled it to about a centimetre thick.

cinnamon dough tree ornaments

Choose a selection of Christmas cookie cutters.

cinnamon dough tree ornaments

Cut out the shapes, re-rolling the dough to get as many decorations from the dough as possible.

cinnamon dough tree ornaments

Using the straw, make a hole in each decoration for the ribbon.

cinnamon dough tree ornaments

Let them dry for a few days. They’ll go quite light when they’re fully dry.

cinnamon dough tree ornaments

Thread ribbon through the holes and hand on the Christmas tree.

cinnamon dough tree ornaments


cinnamon dough tree ornaments


cinnamon dough tree ornaments

We’ll be making candy cane reindeer tomorrow 🙂

To see all of the 24 tutorials, check out my Pinterest board

Salt Dough Photo Frame #24XmasCrafts

Salt Dough Photo Frame

These salt dough photo frames make lovely personalised gifts for grandparents. I’m keeping ours though because I love it too much to give away!

dough frame


For the dough, you will need:

  • 1 cup Plain flour
  • Half a cup salt
  • Half a cup water
  • A rolling pin
  • A knife


salt dough photo frame

Mix all the ingredients until a dough forms. Knead the dough for around 5 minutes to help with the elasticity.

salt dough photo frame

Roll out the dough then cut to size. It helps to use a photo to see how big your frame needs to be.

salt dough photo frame

Cut out the middle of the photo frame a little bigger than the photo you’re going to be framing.

salt dough photo frame

Squash each side in a bit to make the frame a nicer shape. Make 2 holes for the ribbon to go through when the frame has dried and been decorated. (Remember to put the holes in the right place. Ours are in the wrong place as I forgot I wanted to use a photo that is landscape, not portrait!)

salt dough photo frame

We left our frame to air dry; depending on the size and thickness, this can take 2-7 days. If you want to speed up the drying process, you can dry them in the oven.

For the decorations you will need:

  • Gold spray
  • Gems
  • Glue
  • Glitter glue
  • Ribbon (not pictured)


salt dough photo frame

Spray the frame gold and leave to dry.

salt dough photo frame


Using the gems, glue and glitter glue, decorate the frame. When the glue has dried, thread the ribbon through the holes and tie at the back.

salt dough photo frame


Glue the photo to the back of the frame.

dough frame


Day 20 tomorrow and I’m getting almost as excited as the girls! We’ll be making cinnamon dough tree ornaments.

To see all of the 24 tutorials, check out my Pinterest board

Verified by MonsterInsights