Browsing Tag:

arts and crafts

The Science Behind Crafting: How It Helps Kids Learn and Grow

crafting - a kid painting a face on a paper plate
Image by rawpixel from Pixabay
This is a collaborative post

Crafting is a beloved pastime for children worldwide. It’s a fun and engaging activity that allows kids to express their creativity and imagination. However, did you know that crafting also has numerous benefits for a child’s development? In this blog post, we’ll explore the science behind crafting and how it helps kids learn and grow.

The Benefits of Crafting for Kids

Crafting offers numerous advantages for children’s development, encompassing various skills and benefits.

Enhances Fine Motor Skills

Crafting involves using small tools and materials, such as scissors, glue, and paintbrushes. These activities help develop a child’s fine motor skills, which are essential for tasks like writing, buttoning clothes, and tying shoelaces. By engaging in craft activities regularly, kids can improve their hand-eye coordination and dexterity.

Boosts Cognitive Development

Crafting also plays a crucial role in cognitive development. When children engage in arts and crafts activities, they learn to follow instructions, solve problems, and think critically. These skills are essential for academic success and overall cognitive growth. Additionally, crafting encourages kids to use their imagination and think outside the box, which can lead to increased creativity and innovation.

Promotes Social and Emotional Development

When crafting is introduced as a playtime activity during playdates or birthday parties, it allows children to interact with other children and adults. They learn to share, take turns, and collaborate with others. This too, helps develop and enhance their social skills and emotional intelligence. This helps develop their social skills and emotional intelligence. Moreover, crafting can be a great way for children to express their feelings and emotions, which is crucial for their mental well-being.

Encourages Self-Expression and Confidence

Crafting provides a platform for children to express themselves and showcase their unique talents. When kids create something with their own hands, they feel a sense of pride and accomplishment. This boosts their self-esteem and confidence, which can have a positive impact on their overall development.

Choosing the Right Art and Craft Supplies

While the benefits of art and craft for kids are clear, it is also essential to choose the right supplies to ensure an enjoyable experience. Look for high-quality materials that are safe, non-toxic, and age-appropriate. A wide range of art and craft supplies can be easily found, making it convenient for parents and carers to stock up on essentials.

From paints and markers to craft kits and activity sets, there are numerous options available to keep your little ones engaged and creative. The best part? These supplies are affordable and of top quality, ensuring that your child’s art and craft experience is both enjoyable and educational.

Crafting Activities for Different Age Groups

1.    Toddlers (1-3 years)

For toddlers, simple craft activities that focus on sensory exploration are ideal. Some great options include finger painting, playdough sculpting, and tearing and gluing paper. These activities help develop their fine motor skills and encourage self-expression.

2.    Preschoolers (3-5 years)

Preschoolers at a greenwood daycare are ready for more advanced craft activities that involve following simple instructions. Some fun ideas include making paper chains, creating collages, and painting with sponges. These activities help improve their cognitive skills and promote creativity.

3.    School-Age Children (6-12 years)

School-age children can handle more complex crafting projects that require planning and problem-solving. Some great options include origami, beading, and woodworking. These activities help develop their critical thinking skills and encourage self-expression.

Incorporating Crafting into Daily Life

Crafting doesn’t have to be limited to designated art time. There are many ways to incorporate crafting into your child’s daily life. For example, you can encourage your child to make handmade cards for special occasions or create decorations for their room. You can also use crafting as a way to bond with your child and spend quality time together.

Another great way to incorporate crafting into your child’s life is by using it as a learning tool. For instance, if your child is learning about colours, you can create a colour-matching game using paint swatches. If they’re learning about shapes, you can have them create a collage using different shaped cut-outs. The possibilities are endless!

The Role of Parents and Caregivers

Parents and caregivers play a crucial role in fostering a love for crafting in children. By providing the necessary supplies, encouragement, and guidance, adults can help children reap the many benefits of crafting. It’s essential to create a supportive and nurturing environment where children feel free to express themselves and experiment with different materials and techniques.

One way to encourage crafting is by setting aside dedicated time for art and craft activities. This could be a weekly family crafting session or a daily quiet time where children can work on their projects independently. By making crafting a regular part of your child’s routine, you’re helping them develop important skills and habits that will serve them well throughout their lives.

Another way to support your child’s crafting journey is by providing them with age-appropriate supplies and resources. Websites like the one mentioned earlier offer a wide range of art and craft products that cater to different age groups and skill levels. By investing in quality supplies, you’re not only ensuring that your child has the tools they need to create, but you’re also showing them that you value their artistic endeavours.

For older children, finding activities that keep their attention can be a challenge. Diamond painting is a popular option that combines focus with creativity. This activity involves placing tiny resin rhinestones onto a coded canvas to create a picture. It is a great way for kids to practice patience and hand-eye coordination. Parents who want to try this craft can find kits and guides at https://canvasbydiamonds.com/ to help them get started. The process is simple but keeps kids quiet and focused for hours.

Crafting and Mental Health

In addition to the cognitive and social benefits, crafting can also have a positive impact on a child’s mental health. Engaging in creative activities can be a great way for children to relieve stress, express their emotions, and find a sense of calm and focus.

Studies have shown that crafting can have a meditative effect on the brain, helping to reduce anxiety and promote relaxation. When children are absorbed in a crafting project, they’re able to tune out distractions and focus on the present moment. This mindfulness practice can have long-lasting benefits for their mental well-being.

Moreover, crafting can be a great way for children to process and express their feelings. When kids create art, they’re often communicating their inner world in a way that words cannot. By encouraging children to use crafting as a means of self-expression, we’re helping them develop emotional intelligence and resilience.

Conclusion

In conclusion, the science behind crafting reveals numerous benefits for children’s learning and growth. From enhancing fine motor skills and boosting cognitive development to promoting social and emotional well-being, crafting is a valuable activity that every child should have the opportunity to engage in.

As parents and caregivers, we have the power to foster a love for crafting in our children. By providing them with the necessary supplies, encouragement, and guidance, we can help them reap the many benefits of this wonderful pastime. So, the next time your child reaches for a paintbrush or a glue stick, remember that they’re not just creating art โ€“ they’re building important skills and habits that will serve them well throughout their lives.

The Benefits of Creative Hobbies and Why You Should Have One

woman doing origami - creative hobbies
Photo by cottonbro studio

Do you have hobbies that you like to work on in your spare time? If not, you could be missing out on something that really enhances your life in so many different ways. Having hobbies can bring a whole host of benefits. Hobbies come in all shapes and forms. But one of the most popular types is creative hobbies. 

In this blog post, weโ€™ll examine the many benefits of having a creative hobby, and weโ€™ll even provide you with some creative hobby inspiration to get you started. So, keep reading to find out why having a creative hobby can be so beneficial:

Reduces Stress

Modern life can be super stressful. So many of us find ourselves juggling a wide range of responsibilities and being pulled in multiple directions. So itโ€™s no wonder that many people suffer from chronic stress and permanently feel anxious and on edge.

One of the great things about a creative hobby is that itโ€™s an excellent way to shift your focus from feeling stressed and to bring your attention to your hobby instead. So instead of having your mind feeling scattered and worrying about your to-do list and the many jobs you need to complete, you can simply enjoy the distraction of working on your fun hobby.

Helps You Learn New Skills

As adults, it can feel like our days of learning are left behind. However, while your formal education may be complete, there are still plenty of opportunities to learn a new skill or two. Taking up a new creative hobby is a perfect example of this.ย 

Challenging yourself to learn a new skill is such a rewarding process. Spending your spare time mastering something new ensures you feel like you are accomplishing something in your downtime, and is far more productive than simply sitting in front of the television binge-watching the latest must-watch series.

Seeing your knowledge and skills develop with practice is rewarding in itself. Noticing that you are gradually improving and making progress with your new creative hobby is really satisfying. Knowing that youโ€™ve started with no knowledge at all and have acquired a new creative passion is definitely something worth celebrating.

As well as helping you use your time productively, learning new skills also helps you to keep your mind active and engaged. This can help you to improve your memory and could even help you to keep conditions such as dementia at bay.

Encourages a State of Flow

Learning how to perform your creative hobby takes concentration and perseverance. You will need to nahe both your mind and body in the task to really master your new skill. Whether you are learning to play a musical instrument or how to make dollar bill origami, you still need to connect your mind and your physical activity to successfully achieve this. 

When youโ€™re fully immersed in your task, you can enter a state of flow. Flow states often bring joy and happiness. They also bring satisfaction, the feeling of being fully absorbed in what you are doing right now without your mind wandering off to other thoughts. In a world where we are constantly being inundated with information, achieving a state of flow can be an extremely welcome way to spend your time.

Enables You to Connect With Others

Another excellent benefit of having a creative hobby is that it allows you to connect with others. Meeting like-minded people who share your passion for your creative hobby can be a useful way to make new friends. You may find that your new creative hobby has online forums where you can chat with others. This feeling of connection can be really beneficial in many ways and help you to feel like part of a wider community.

Creative Hobby Ideas

If youโ€™re keen to enjoy all of the above benefits, you may feel ready to get started with a creative hobby. But which one should you choose? Here are some creative hobby ideas to inspire you:

  • Origami
  • Knitting
  • Embroidery
  • Paper crafts
  • Painting
  • Sketching
  • Photography
  • Pottery
  • Woodworking
  • Sculpture
  • Jewellery making
  • Collage
  • Colouring
  • Pyrography
  • Calligraphy
  • Screen printing
  • Tapestry
  • Candle making
  • Musical instruments
  • Baking
  • Sugarcraft
  • DIY crafts
  • Upcycling
  • Crocheting
  • Quilting
  • Sewing
  • Diamond painting
  • Needle felting
  • Macrame
  • Creative writing
  • Wood turning

As you can see, there are a huge number of potential creative hobbies you can start. Each of them has the potential to enrich your life in so many ways and help you make the most of your spare time. All you need to do is pick one!

Turn Your Craft into a Career

This is a collaborative post
Image by Bob Dmyt from Pixabay

Earning money doing something you love- itโ€™s pretty much the dream. If you already have a crafty hobby that you enjoy, chances are youโ€™ve considered what it would take to bump things up to the next level and start earning money. While it can be a bit of a faff getting started, once youโ€™re all up and running it can be plain sailing from there. Hereโ€™s what you need to do!

Setting up your business- the digital side of things

Regardless of the type of business you intend on running, there are a few things youโ€™ll need to do first. Decide on your name and check that you can get the matching domain name (you can do a domain name search to investigate this) and social media accounts. This can be a big job within itself and can take a number of days of pondering over different choices and researching to check you can get the name you want across all platforms. Youโ€™ll then need to have a website designed, there are lots of professionals online so itโ€™s easy to find someone to do a great job for you. From there, find out the kind of software youโ€™ll need. It could be verification or compliance software such as http://jumio.com/kyc-compliance. Most businesses will need some kind of accounting and financial software. If you deal with lots of customers, a helpdesk or ticketing service could be useful. Youโ€™ll more than likely need certain insurances too depending on what you do, so donโ€™t overlook this. Go online and let HMRC know that youโ€™re starting up, itโ€™s a few forms to register and theyโ€™ll contact you and let you know if thereโ€™s any more information you need to send.

Building a site is just the first step in getting people to find your work. Many new owners find that they need a clear plan to turn visitors into actual customers. A good strategy focuses on how local people search for services in their own town. You can look at resources like https://hookedmarketing.net/ to see how professional teams handle these technical details. This makes it easier to focus on the creative parts of your new job. It is often better to have a solid foundation from the start than to fix mistakes later.

Setting up the physical elements of your business

Once all of the paperwork side of things has been sorted, you can get to work on setting up the equipment and materials you need. As youโ€™re turning your hobby into a business, chances are you already have a few things to get started, but to start selling you might need to invest in more. For example, if youโ€™re starting a baking business youโ€™ll need a fridge thatโ€™s separate to your homeโ€™s fridge- this is a legal hygiene requirement. You might also need to make changes to bring your kitchen up to scratch so that it meets guidelines. If youโ€™re doing any kind of art or physical craft, you could turn a bedroom into a studio. Good lighting, floors that are easy to clean and all of the right materials will be needed. If your business will be done on the computer, such as writing or design then you may need to upgrade your tech.

Promote in the right way

For some creative businesses, youโ€™ll promote what you do in the same way as any other online business. If what you make can be shipped and sold across the country (or even the world!) then you need to ensure youโ€™re reaching all of these markets. However, in some cases, your creative business will be much more local. Take florists, caterers and bakers for example. In most cases, your customers will only be coming from your immediate area. So you wouldnโ€™t waste money promoting far and wide across the internet. If youโ€™re stuck, you could always hire a marketing manager to help.


Rock Painting & Daisy Made Ice Cream

Daisy Made Ice Cream

I think I can speak for us all when I say we love Daisy Made ice cream. They have different flavours every time we go and it’s always hard to choose ๐Ÿ™‚
Daisy Made makes it on to every bucket list we make and it wouldn’t be the summer holidays without a trip there.


Daisy Made ice cream
I had a scoop of Cheeky Monkey (chocolate and banana) and a scoop of pear flavoured ice cream ๐Ÿ™‚

Ant posing
Ant posing in his new Cool Daddy t-shirt!

We took Nanny to Daisy Made this week. She’d never been before and she now loves it as much as we do!
We didn’t stay long because the weather turned from lovely sun to chilly wind notย long after we got there. The girls like playing crazy golf when we visit but I didn’t fancy standing in the wind for an hour while they played. I don’t play because I don’t really enjoy crazy golf!

Nanny and Ella at Daisy Made

Kaycee at Daisy Made

Rock Painting

While working at the charity shop I came across an unused set of acrylic paints. I didn’t have a use for them when I bought them, I just figured it would be good to have them.

While browsing Pinterest I saw some lovely rock painting designs. I knew Kaycee and Ella would love having a go at rock painting and I was right. We spent a really lovely afternoon together creating lovely rocks for the garden.

We just have to varnish them now so they’ll last for years outside ๐Ÿ™‚

Rock Painting

Rock Painting


Rock Painting
Kaycee’s minion ๐Ÿ™‚

Rock Painting

Rock Painting
My birdie ๐Ÿ™‚

Rock Painting
Kaycee’s watermelon and my ice cream

Rock Painting
My mouse

rock painting unicorn
Ella’s unicorn

I think this is going to be one of our rainy day activities. We’ve got loads of rocks in the garden around the pond.
We’re hoping to go to the seaside soon as well so we’ll collect lots more rocks while we’re there ๐Ÿ™‚


We’ve Been Tie-Dying Some T-Shirts

Tie-Dying T-Shirts


Ella’s friend came to play and Ella invited her to tie-dye some t-shirts with us. It was one of our summerย bucket list items. I’d bought a bright pink and a purple dye from eBay and some packs of t-shirts from Asda. The dyes were just ยฃ4 a pack and the t-shirts were ยฃ3 for 2.

The girls loved tie-dying. They’ve have asked if I can get some more dye in other colours so they can try different designs. As it was, I had to go to Asda again and get more t-shirts because they wanted to use the dye again!

tie-dying-t-shirts

tie-dying-t-shirts tie-dying-t-shirts

tie-dying-t-shirts

tie-dying-t-shirts

tie-dying-t-shirts


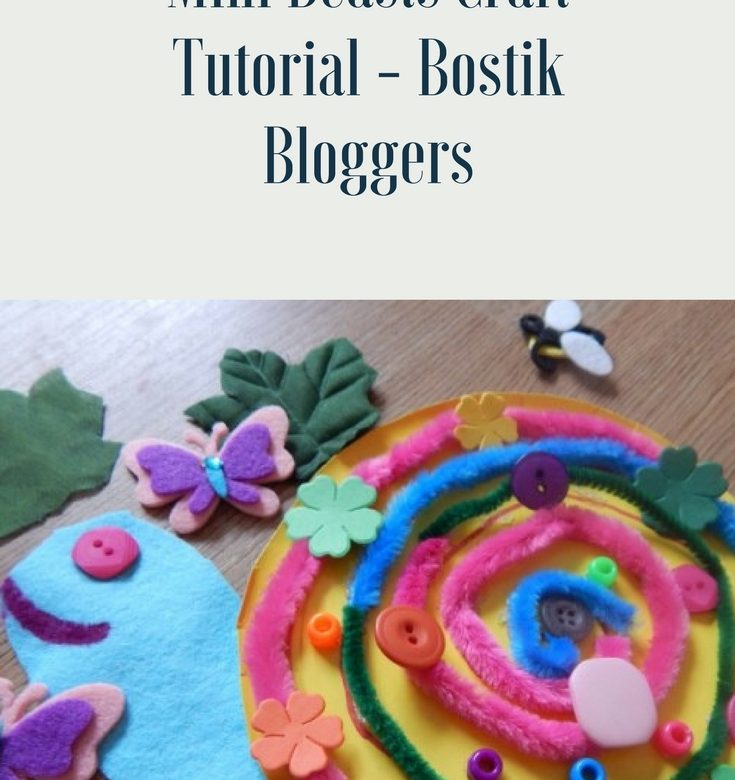
Bostik Bloggers Craft – Mini Beasts

Mini Beasts

The girls love getting the Bostik bloggers craft box every month and usually work together to make something but this month, Ella’s been really busy with one thing and another so Kaycee did it all on her own this month.

The theme is Mini Beasts. For more activities about this theme, click here

She took all the photos and is writing up the tutorial so I’ll hand over to Kaycee ๐Ÿ™‚


Image26

what you need :

felt
buttons and other creative decorations
paper plate
pipe cleaners
stickyย dots
marker pen

bostick-craft-bloggers-mini-beasts-01

draw a spiral onto a paper plate and then cut off the outside rimย ( it does not matter if it looks a bit messy)

bostick-craft-bloggers-mini-beasts-02

using glue dots stick pipe cleaners tracing the spiralย (again it does not matter if it looks messy)

bostick-craft-bloggers-mini-beasts-03

decorate in between the pipe cleaners using buttons and craft bits

bostick-craft-bloggers-mini-beasts-04

Then cut out (using felt) the shape of a snail body and stick to the back of your plate

bostick-craft-bloggers-mini-beasts-05

add a button as the eye and use the marker to draw a lovelyย smile!

bostick-craft-bloggers-mini-beasts-07

to add sturdiness attach two lollypop sticks to the back

bostick-craft-bloggers-mini-beasts-06

pierce a hole and thread string through it

bostick-craft-bloggers-mini-beasts-09

you can now hang it on the wall as a pretty decoration ๐Ÿ™‚

bostick craft bloggers mini beasts


Great job, Kaycee ๐Ÿ™‚

Thanks to Tots100 and Bostick for the monthly craft challenge.


shell-doll-sig-01

For more craft ideas, click here

Dragon craft – Bostik Bloggers Monthly Craft Challenge

Dragon Craft

Kaycee's Dragon - dragon craft
Kaycee’s dragon

Our Bostik Bloggers craft box arrived last week but the girls have been busy with Guides/Cubs/Football clubs etc that we’ve only just managed to make our dragons!

For this craft, you’ll need:

3 toilet roll middles
Glue
Coloured/Patterned paper or card
Gems/Decorations
Pipe Cleaners
Stapler
Threaded sequins or wool/elastic
Felt


bostik-craft-bloggers-dragons-01 - dragon craft

Decorate the three toilet roll middles, one for the head and two for the body

Decorated toilet roll middles - dragon craft

Using felt or coloured card, make the eyes. We cut ours so they had big eyebrows!
Using glue, attach to the toilet roll middle that you’re using for the head, then using a stapler, staple pipe cleaners in the mouth for the fire.
Draw on the teeth down each side of the toilet roll middle and dots on the top for the nostrils.

Dragon head - dragon craft

Using sequin string or wool/elastic, cut a piece about 10cm long and staple inside the head, behind the eyes.
Staple the other end inside the first roll that you’re using for the first body part.

Attaching the toilet rolls - dragon craft


Attaching the toilet rolls - dragon craft

Attach the last body roll in the same way and if you like, add some more pipe cleaners for the tail

Toilet paper dragon craft
Ella’s dragon

We were sent a box of craft items from Bostik and Tots100 as part of the Bostik bloggers crafters.

For more craft posts, click here

Bunny Tails Easter Activity Tutorial #BostikBloggers

ย The theme for our Bostik Bloggers craft challenge this month is Easter so the girls are making these lovely Easter gifts to give to friends at school. They’re very easy and cheap to make ๐Ÿ™‚
Bunny tails marshmallow Easter gift - Easter activity

Easter Activity

You will need:
Small cellophane food bags
Card
A stick on spring flower
Decorative tape
A bunny shape cut out of card or like ours, a piece cut out of a sheet of foam
Adhesive
Double sided sticky pads
Felt tip pen
White mini marshmallows
Easter Craft supplies - Easter activity
Gather your supplies


Marshmallows and craft supplies - Easter activity


Bunny tails bag header card - Easter activity
Cut a piece of card the same width as your bag.
Our bags are 9cm x 13cm so I made the header 9cm x 7cm


Decorate bunny tails bag header - Easter activity
Decorate the header with the tape, flowers and rabbit shape then write Bunny Tails on it and fold it in half


Put marshmallows in bag - Easter activity
Fill the bag 3/4 full with marshmallows


Seal marshmallows in bag - Easter activity
Double fold the top of the bag and secure with some tape
Finished bunny tails gift bag - Easter activity
Use 4 double sided sticky pads, one on each corner inside the header to secure the header to the bag


Easter crafts bunny tails bag and Easter chick card - Easter activity
This is Kaycee’s bunny tails bag and an Easter decoration she made with some of the other craft materials.


Ella's Easter crafts - Easter activity
Ella made a little bunny family…


Ella's bunny tails - Easter activity
before making her bag of bunny tails ๐Ÿ™‚

For more craft posts, click here

Valentine’s Card – Bostik Bloggers Challenge

Valentine's Card

We’re very excited to be part of the Bostik Bloggers family this year. We received our first craft box on Saturday and found time last night to make a Valentine’s card.
We wanted to be a little more creative with our first box but time wasn’t on our side this week!

Kaycee made a Valentine’s postcard, Ella made a Valentine’s picture card for her teacher and I made a Valentine’s card for Ant, which I’m going to show you how to make in the following tutorial.

Valentine’s Card

You will need:

A4 Gold card
Red glitter card
A piece of patterned fabric or backing paper
Gem heart stickers
Glue
Ribbon
Red glitter pen


Instructions

Fold the gold card in half.

Using the backing fabric/paper, cut 3, 5cm squares and glue them onto the card, overlapping them and rotated into diamond shapes.

Stick the gem hearts in a horizontal line, onto the top corner of the card. Cut a love heart shape out of the red glitter card and glue it onto the middle square

Using the red glitter pen, draw a love heart at the bottom corner of the card then stick the ribbon down the other side of the card.


You can still see the white glue on the card above but once it dries, it goes clear so you won’t see it ๐Ÿ™‚

Here are Kaycee and Ella’s creations.

Ella’s card for her teacher (I covered her teacher’s name)


Valentine's card
This is Kaycee’s card. I’m not sure if she has a recipient in mind!


For more craft posts, click here

Galt Shrinking Jewellery

I loved making things out of shrinkable plastic when I was younger so I knew my girls would love to try out a Shrinking Jewellery Craft kitย from Galt ๐Ÿ™‚

They got to work on the colouring in straight away but since the first night, we seem to have been busy with lots of other things and have only just got round to getting to the actual shrinking part!

Galt shrinking jewellery Fashion design kit

Galt shrinking jewellery kit

As well as the printed designs, you get 4 plain sheets of the shrinking plastic so you can do your own designs or trace ones from the printed sheets provided.

Contents of fashion design kit
Contents of Galt shrinking jewellery Fashion design kit
Extra shrinking sheets and jewels
Getting ready to shrink

Our first attempt at putting them in the oven didn’t go very well but it was totally our fault! We used the fan oven and it just blew the foil around and I don’t think we let it preheat for long enough.

We could have put it back in and tried again but Kaycee liked the effect!

After the first try, we used the other, non fan oven and I helped them along a bit by pressing them flat with a spatula when a couple of them started to curl up.

Ella and her glasses necklace
Shrunken cherry necklace

Ella loves her necklaces and can’t wait to make some more of her own designs ๐Ÿ™‚

Please note: We were sent the kit in return for an honest review.

Verified by MonsterInsights