Browsing Tag:

#24XmasCrafts Advent

Let It Snow Scrabble Ornament #24XmasCrafts

Let It Snow Scrabble Ornament


I can’t believe it’s Christmas Eve already! For our final #24XmasCraft advent tutorial, we made a Let It Snow tree ornament using Scrabble tiles.

You will need:

  • Scrabble tiles
  • Card or stiff paper with a Christmas design printed on one side (not pictured)
  • Fake snow
  • Ribbon
  • Glue – I found a glue gun worked best

Let it snow Scrabble tree ornament

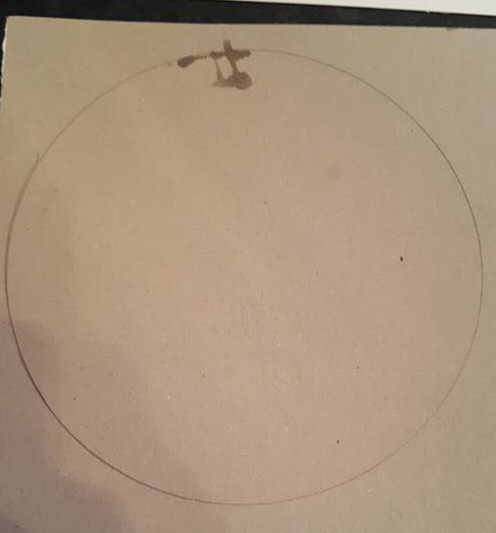
Draw around the scrabble tiles as in the photo below.

Let it snow Scrabble tree ornament

Cut out the card.

Let it snow Scrabble tree ornament

Stick the Scrabble tiles onto the plain side. I found using a hot glue gun worked best.

Let it snow Scrabble tree ornament

Bend each row apart so you can glue in between the tiles.

Let it snow Scrabble tree ornament

Glue the ribbon to the back. If you want to cover the ribbon, cut another piece of card, the same size as before and glue it to the back, over the ribbon.

Let it snow Scrabble tree ornament

Put glue on the top of each row and sprinkle the fake snow onto the glue. When the glue is dry, hang on the tree.

Let it snow Scrabble tree ornament

I hope you’ve enjoyed our #24XmasCraft advent tutorials. We had great fun making everything.

Merry Christmas and a very happy new year 🙂

To see all of the 24 tutorials, check out my Pinterest board

Paper Plate Angel #24XmasCrafts

Paper Plate Angel


Here’s our penultimate Christmas craft tutorial and we’re going to be making paper plate angels. It’s another easy craft for little hands 🙂

Paper plate angel

You will need:

  • A paper plate
  • Scissors
  • Glue
  • Card for the hair and face
  • A silver pipe cleaner
  • Glitter glue
  • Sticky tape

Paper plate angel

Cut a triangle piece out of the plate to make the angel’s body.

Paper plate angel

Cut a circle for the face and a piece of hair out of the card. Draw the features on the face.

Paper plate angel

Stick the face to the hair then stick the face and hair to the body.

Paper plate angel

Stick the body onto the other piece of the plate which will be the wings.

Paper plate angel

Make a halo using the silver pipe cleaner.

Paper plate angel

Stick the halo to the back of the angel using sticky tape.

Paper plate angel

Decorate the angel’s dress and wings with glitter glue and allow to dry.

Paper plate angel


Paper plate angel


It’s our last #24XmasCrafts tutorial tomorrow and we’ll be making another scrabble Christmas tree ornament.

To see all of the 24 tutorials, check out my Pinterest board

Paper Star Chain #24XmasCrafts

Paper Star Chain

We love all things glittery and this paper star chain is no exception. It’s very easy to make and looks pretty when hanging on the wall or door.

paper star chains

You will need:

  • Paper
  • String
  • A pencil
  • A mug
  • Glue
  • Glitter
  • Sticky tape

paper star chain

Draw around the mug on a piece of paper and cut out the circle. Fold it in half then fold it in half three more times. Draw a line at the top from corner, as in the photo and cut along this line.

paper star chain

Open up the paper and you will have a star. Now decorate the star with glue and glitter.

paper star chain

Stick the string to the back of each star using sticky tape.

paper star chain

Hang on the wall or a door or anywhere you like, really!

paper star chains


Only 2 more to go! Tomorrow we’ll be making paper plate angels.

To see all of the 24 tutorials, check out my Pinterest board

Candy Cane Reindeer #24XmasCrafts

Candy Cane Reindeer

Kaycee loved making these sweet candy cane reindeer. They don’t take very long and are another cheap and easy gift idea for school friends 🙂

candy cane reindeer

You will need:

  • A candy cane
  • 2 googly eyes
  • A pipe cleaner
  • A pencil
  • Glue
  • A sparkly pom pom


candy cane reindeer

Fold the pipe cleaner in half to find the middle then twist it around the top of the candy cane to secure it.

candy cane reindeer

Wrap each side of the pipe cleaner around the pencil to make the antlers.

candy cane reindeer

This is what you should have.

candy cane reindeer

Glue two googly eyes onto the candy cane.

candy cane reindeer

Glue the sparkly pom-pom onto the end of the candy cane to make the nose and you’re done 🙂

candy cane reindeer

Mix and match different coloured pipe cleaners and pom-poms to make different ones.

candy cane reindeer

Day 22 tomorrow and we’ll be making a paper star chain.

To see all of the 24 tutorials, check out my Pinterest board

Cinnamon Dough Tree Ornaments #24XmasCrafts

Cinnamon Dough Tree Ornaments


These no-bake cinnamon dough tree ornaments smell lovely and dry a nice light brown colour. You can leave them as they are or paint them.

cinnamon dough tree ornaments

You will need:

  • 1 cups of plain flour
  • Half a cup of salt
  • Half a cup (approx 40g) of cinnamon
  • 3/4 cup of water
  • Rolling pin
  • Christmas cookie cutters
  • Ribbon
  • A straw

cinnamon dough tree ornaments

Mix all the ingredients together until a dough forms. Knead the dough for around 5 minutes.

cinnamon dough tree ornaments

Roll out the dough to the desired thickness.

cinnamon dough tree ornaments


We rolled it to about a centimetre thick.

cinnamon dough tree ornaments

Choose a selection of Christmas cookie cutters.

cinnamon dough tree ornaments

Cut out the shapes, re-rolling the dough to get as many decorations from the dough as possible.

cinnamon dough tree ornaments

Using the straw, make a hole in each decoration for the ribbon.

cinnamon dough tree ornaments

Let them dry for a few days. They’ll go quite light when they’re fully dry.

cinnamon dough tree ornaments

Thread ribbon through the holes and hand on the Christmas tree.

cinnamon dough tree ornaments


cinnamon dough tree ornaments


cinnamon dough tree ornaments

We’ll be making candy cane reindeer tomorrow 🙂

To see all of the 24 tutorials, check out my Pinterest board

Salt Dough Photo Frame #24XmasCrafts

Salt Dough Photo Frame

These salt dough photo frames make lovely personalised gifts for grandparents. I’m keeping ours though because I love it too much to give away!

dough frame


For the dough, you will need:

  • 1 cup Plain flour
  • Half a cup salt
  • Half a cup water
  • A rolling pin
  • A knife


salt dough photo frame

Mix all the ingredients until a dough forms. Knead the dough for around 5 minutes to help with the elasticity.

salt dough photo frame

Roll out the dough then cut to size. It helps to use a photo to see how big your frame needs to be.

salt dough photo frame

Cut out the middle of the photo frame a little bigger than the photo you’re going to be framing.

salt dough photo frame

Squash each side in a bit to make the frame a nicer shape. Make 2 holes for the ribbon to go through when the frame has dried and been decorated. (Remember to put the holes in the right place. Ours are in the wrong place as I forgot I wanted to use a photo that is landscape, not portrait!)

salt dough photo frame

We left our frame to air dry; depending on the size and thickness, this can take 2-7 days. If you want to speed up the drying process, you can dry them in the oven.

For the decorations you will need:

  • Gold spray
  • Gems
  • Glue
  • Glitter glue
  • Ribbon (not pictured)


salt dough photo frame

Spray the frame gold and leave to dry.

salt dough photo frame


Using the gems, glue and glitter glue, decorate the frame. When the glue has dried, thread the ribbon through the holes and tie at the back.

salt dough photo frame


Glue the photo to the back of the frame.

dough frame


Day 20 tomorrow and I’m getting almost as excited as the girls! We’ll be making cinnamon dough tree ornaments.

To see all of the 24 tutorials, check out my Pinterest board

Candy Cane Christmas Tree #24XmasCrafts

Candy Cane Christmas Tree

These are lovely for the kids to make for friends at school and they don’t cost much.

You will need:

  • Green felt
  • Glitter glue
  • Scissors
  • A candy cane
  • A pen or pencil


Candy Cane Christmas Tree

Fold the piece of felt in half and draw half a Christmas tree, making sure to draw it on the folded side.

Candy Cane Christmas Tree

Cut out the tree and open it up. Lay the cane on the tree and mark where the cuts need to be.

Candy Cane Christmas Tree

Fold the tree in half make the small cuts where the cane will go.

Candy Cane Christmas Tree

Put the cane in the holes.

Candy Cane Christmas Tree

Decorate using the glitter glue and let it dry before giving it as a gift 🙂

Candy Cane Christmas Tree


Nearly there! Day 19 is a tutorial to make a salt dough photo frame gift.

To see all of the 24 tutorials, check out my Pinterest board

Paper Hand Wreath #24XmasCrafts

Paper hand wreath

I love this craft. I’m going to save this hand wreath to use every year because it’s lovely to see how small your child’s hands were.

Christmas paper hand wreath

You will need:

  • Christmas themed backing papers
  • 2 pieces of stiff card
  • Glue
  • Scissors
  • Ribbon
  • A small plate
  • A pencil

Christmas paper hand wreath

Place the plate on a piece of stiff card and draw around it. Cut out the circle.

Christmas paper hand wreath

Draw a smaller circle in the middle of the large one and cut it out.

Christmas paper hand wreath

On the other piece of stiff card, draw around your child’s hand. Cut it out and use this as a template. Now draw lots more hands on the printed backing papers. The number needed will depend on how big you’re making your wreath.

Christmas paper hand wreath

Cut out all the hands. This can take a while!

Christmas paper hand wreath

Glue the hands onto the card circle you make earlier, overlapping the hands to cover the card.

Christmas paper hand wreath

Tie some ribbon onto your wreath and hang it up 🙂

Christmas paper hand wreath


On day 18 we’ll be making a candy cane Christmas tree using felt.

To see all of the 24 tutorials, check out my Pinterest board

Fairy Tree Ornament #24XmasCrafts

Fairy Tree Ornament

Kaycee’s using our fairy tree ornament as the tree topper on her mini Christmas tree. Ella wanted one for hers so her daddy made her one. He used pom-poms for the face instead of card. Ella LOVEs it! 🙂

fairy tree ornament

You will need:

  • Paper or card
  • Scissors
  • Glue
  • String or ribbon
  • A mug
  • Gold or silver pen

fairy tree ornament

Draw around the mug and cut out the circle

fairy tree ornament

Cut the circle in half

fairy tree ornament

Using one-half of the circle, cut out 2 arm shapes

fairy tree ornament

Decorate the sleeves

fairy tree ornament

Cut out 2 hands and glue on to the sleeves

fairy tree ornament

The other half of the circle is for the fairy’s dress. Decorate it to match the sleeves.

fairy tree ornament

Fold the dress semi-circle into a cone shape and stick with glue or tape

fairy tree ornament

Make the head

Cut a small circle for the head then use it to draw hair on one-half of a folded piece of card. Fold the card and cut out the hair. Use this piece to draw around and cut out another shape.

fairy tree ornament

Stick the face on to one of the hair pieces.

fairy tree ornament

Use a folded piece of card to draw the wings on one-half next to the fold. Cut the wings out.
Cut a piece of string or ribbon that’s long enough to thread through the dress, have enough hanging at the bottom to make legs and enough at the top to attach the head too. Make a knot about 2 thirds down which will hold the dress in place and stop it sliding off.

fairy tree ornament

Thread the string through the dress

fairy tree ornament

To attach the head, first stick the piece of hair without the face, on to the string then stick the piece with the face, to the front of the hair, making sure the string is in the middle of the 2 pieces.

fairy tree ornament

Stick the wings and arms to the dress and thread some beads onto the string for the feet

fairy tree ornament

Hang on the tree or use as a tree topper like Kaycee has done on her mini Christmas tree!

fairy tree ornament

On day 17 we’ll be making a hand wreath using Christmas backing papers.

To see all of the 24 tutorials, check out my Pinterest board

Toilet Roll Tube Christmas Tree #24XmasCrafts Advent

Toilet Roll Christmas Tree

This toilet roll tube Christmas tree is a nice and easy craft for little hands to make.

You will need:

  • 4 toilet roll tubes
  • Green paint
  • Sticky tape
  • Stickers/Gems/Sequins to decorate


toilet roll Christmas trees

Use the first tube for the bottom of the tree then cut each tube a bit smaller. The top tube can be cut in half. Use one-half for the top of the tree and the other half for the trunk.

toilet roll Christmas trees

Stick the tree tubes together with sticky tape

toilet roll Christmas trees

Paint the tubes green and leave to dry

toilet roll Christmas trees

When the paint is dry, stick the trunk on and decorate

toilet roll Christmas trees

For day 16 we’ll be making fairy tree ornaments 🙂

To see all of the 24 tutorials, check out my Pinterest board

Verified by MonsterInsights